Monday, 9 September 2024

Tuning Considerations


Tuning Considerations

There are various strategies available to tune integrations, and include:

SQL Mapping

The SQL Mapping feature is available to use for complex mapping requirements, and also may be used to replace multiple wildcard * to * mapping rules with a single pass of the database.

Each type of mapping uses resources differently, and the mapping performance is in the following order, where Explicit is the fastest, and Multi-Dim is the slowest:

  1. EXPLICIT
  2. IN
  3. BETWEEN and LIKE
  4. MULTI-DIM

Multi-dim mappings are the slowest mapping, and try to limit multi-dim rules for complex use cases where you need to use a combination of EXPLICIT and LIKE mapping. For example, ENTITY = 100 AND ACCOUNT LIKE 4*.

As an additional tuning strategy, you may be able to replace multi-dim mappings with explicit mappings by combining source dimensions. For example if ENTITY=100 AND ACCOUNT=4100 you can concatenate ENTITY and ACCOUNT as the source, and define an EXPLICIT mapping for 100-4000.

Expressions

Expressions may also be used instead of mapping rules, and this technique also helps improve performance. To replace the * to * "like" mapping rules, the CopySource expression may be used, and looks like the following:
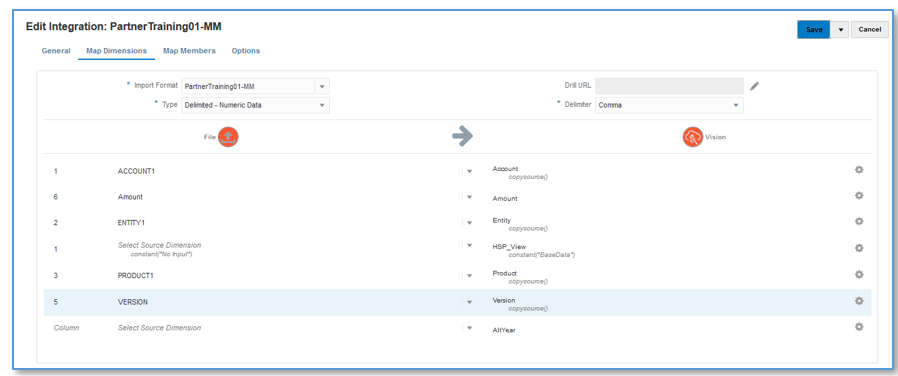
Image shows the CopySource expression.

This expression does the same thing as the * to * mapping, and it is applied during import, rather than via a scan of the table with a SQL statement. The performance of expressions is roughly the same as using a single SQL mapping rule, but it is recommended to use expressions when data volume is large so mapping does not fail because of database governor limits. (Expressions are processed during the import step of the load process.)

Simple Workflow Mode

With the Simple Workflow mode, the TDATASEG table is bypassed, and data is loaded directly to the target. This technique eliminates the copy of data to TDATASEG, and also the delete from TDATASEG. The only caveat is that drill-through to the Data Integration landing page is unavailable. (Drill-through using direct drill is available.)
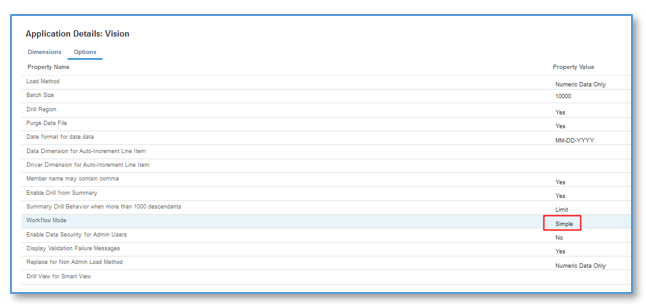
Image shows the Simple Workflow mode option.

Using this simple workflow mode with expressions, the entire load process took 5 minutes and 16 seconds:
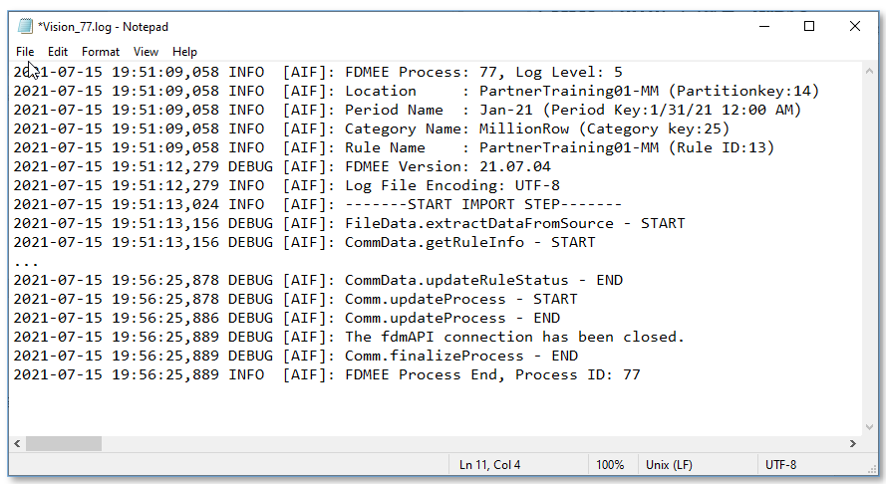
Image shows the results using Simple Workflow mode.

Quick Mode

Quick mode should be considered for high volume data loads that do not require complex transformations. Quick mode by-passes most of the steps and database tables in the workflow process, but does support expressions for simple transformations. As a rough benchmark, Quick mode is able to load approximately 1,000,000 rows per minute to the target application. Users are able to use the direct-drill feature even in Quick mode, and by-pass the Data Integration landing page when drilling.

Additional Considerations

When defining integrations, the Workflow Mode, and load method directly impact the performance of the load based on the specific data volume. When loading up to about 500,000 source records/rows, any workflow mode is recommended when using the load method of "Numeric Data Only."

When using the load method of "All Data with Security," expect that the data load takes longer because each row is validated against the target application in regard to any user defined security.

When loading files over 1,000,000 rows, the system performs batch updates and deletions from the TDATASEG_T and TDATASEG tables based on the "Batch Size" setting in the Target Options (see Defining Target Options). In some cases, files over 1,000,000 rows may be split into files each with less than 1,000,000 rows, and this usually results in a performance improvement. Users may then create multiple integrations, one for each file, and then combine these integrations into a batch, running the batch in parallel mode to maintain the performance achieved by splitting the file. This provides a single execution point, that kicks off multiple rules for the split file.

The following table provides recommendations in regard to workflow mode, load method and data volume.

Table A-1 Recommend Workflow Mode, Load Method, and Data Volume

Workflow ModeLoad MethodRow Count

Full Workflow

Numeric Data Only

Up to about 3 million rows

Simple Workflow

Numeric Data Only

Up to about 4-5 million rows

Full Workflow

Admin User

All Data with Security

Validate Data for Admin = Yes

Less than 500,000 rows

Full Workflow

Admin User

All Data with Security

Validate Data for Admin = No (This loads to the target using the Outline Load Utility)

Up to about 3 million rows

Quick Mode

Numeric Data Only

Any row count

Quick Mode

Validate Data for Admin = Yes is not supported.

Admin User

All Data with Security

Validate Data for Admin = No (This loads to the target using the Outline Load Utility)

Any row count

Note:

Tuning integrations is somewhat of an art, and the same techniques may not be applicable in all cases. Tuning usually requires multiple iterations to get to a final solution, and time should be included in all implementations to address tuning.

Oracle provided these in below link 

Tuning Considerations (oracle.com)
(https://docs.oracle.com/en/cloud/saas/enterprise-performance-management-common/diepm/integrations_tuning_considerations.html)

Sunday, 8 September 2024

     Lookup limit in OIC

Maximum 100 lookups can be created 

Mandatory Report Parameters

 Mandatory Report Parameters

3 parameters used for xml bi publisher report in integration

1. Report absolute path

2. size of Data chunk Download

3. Parameter name values

Difference between Gen2 and Gen3

 Difference between Gen2 and Gen3

Gen3

Gen2

In Gen3, The activity stream has been greatly enhanced and can be viewed and downloaded from the Instances page, Instance Details page, and

Errors page.

 Activity stream download API and download option on the Integration dashboards page under the View menu.

The on-premises connectivity agent must use JDK 17

it was JD 8, 11 and 17

When making an API call with the REST Adapter, you encode the integration identifier with a pipe (|) symbol.

When making an API call with the REST Adapter, you encode the integration identifier with a %7c.

The system-generated instance ID that is displayed on the Instances page and in the activity stream for an integration instance has

String data type.

The system-generated instance ID that is displayed on the Instances page and in the activity stream for an integration instance has

Integer data type.

Basic routing integration style is Not Supported in Oracle Integration

Basic routing integration style is Supported in Oracle Integration

File transfer integration style is Not Supported in Oracle Integration

File transfer integration style is Supported in Oracle Integration

Publish To OIC and Subscribe To OIC is not supported (Events are introduced)

Publish To OIC and Subscribe To OIC is supported

Friday, 6 September 2024

Drill Down (Master - Detail) in OTBI Report

           Drill Down (Master - Detail) in OTBI Report

Overview Steps

A.     Create two Analysis

1st analysis report where Subject area is Payable Invoice report.

Columns: Invoice_Number, Invoice_Date, Invoice_Description, Invoice_Amount, Supplier.

2nd Analysis report where Subject area is Supplier Real Time (Subject Area)

Columns: Supplier (Supplier Name), Supplier_site (Site, Address_line_1), Supplier_Contact_Details(First_Name, Last_Name, Email_address)

B.     Create Prompt subject Area Payable invoice real time.

Catalog > Create > Dashboard prompt

Create Presentation Variable = P_Supp_Name

C.    Edit Payables Invoice Report for

i.                    Creating the presentation variable.

ii.                  Create the Interaction

D.     Edit the Supplier Report for

i.                    Creating the presentation variable


1.      1. Create two Analysis.

1st analysis report where Subject area is Payable Invoice report.

Columns: Invoice_Number, Invoice_Date, Invoice_Description, Invoice_Amount, Supplier.

 Navigation > Tools > Reports and Analytics > Browse Catalog > Create > Analysis >


Select Subject Area


In search place enter – Supplier


Click on Ok Button

2nd Analysis report where Subject area is Supplier Real Time (Subject Area)

Columns: Supplier (Supplier Name), Supplier_site (Site, Address_line_1), Supplier_Contact_Details(First_Name, Last_Name, Email_address)

In search place enter – Supplier


Click on OK button.

2.      2. Save the Analysis.

3.      3. Create Prompt with Subject Area Payable invoice real time.

Catalog > Create > Dashboard Prompt

Select Subject Area as “Payables Invoices – Transactions Real Time”


Select supplier > Supplier column


Click Ok button


Create Presentation Variable – P_Supp_Name

Click OK button.


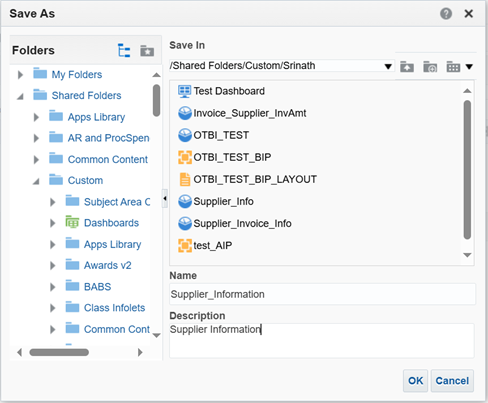
Saved as Payables_Supplier_Prompt

4.      4. Creating the Presentation Variable and Creating the Interaction on Supplier Column.

Go to Catalog and open Invoice_Supplier_InvAmt OTBI report by clicking on EDIT button


And go to Criteria

Next select Supplier column setting


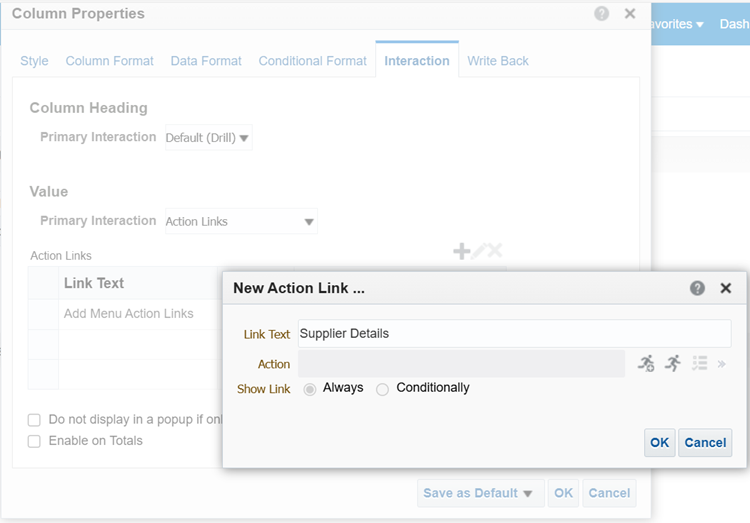
Select Column Properties


Click Interaction > Value – Action Links

And click on Add (+) symbol

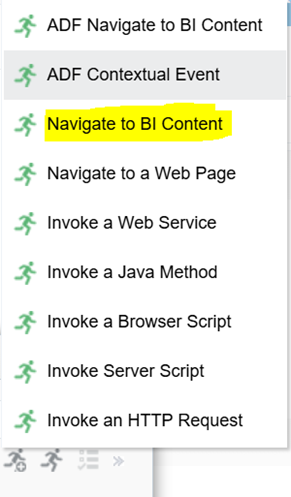
Click on Create New Action


And select “Navigate to BI Content”


Supplier_Information OTBI report

Click on OK button

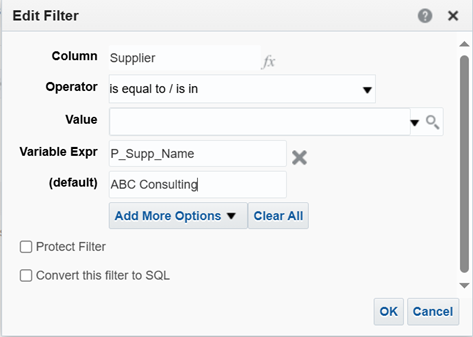
5.      5. Add new filter for the Invoice_Supplier_InvAmt OTBI report for Supplier which we have created the Dashboard Prompt.


And click on OK button

6.   6.      Edit Supplier_Information OTBI report for

Creating the Presentation Variable


Click OK Button and Save the report

7.     7. Create the Dashboard and run the report

Catalog > Create > Dashboard


Click on OK Button and it will generate one blank Dashboard.


By pulling the Payables_Supplier_Prompt and Invoice_Supplier_InvAmt

And save it and verify by clicking on Run button.


Click on Supplier name and it will navigate to the supplier details reort (Detail report – Supplier_Information)


      8. Go to Catalog and click on open for Master Detail Dashboard Report.


And edit the Invoice_Supplier_InvAmt report properties in Master detail Dashboard